• Welcome to Autism Forums, a friendly forum to discuss Aspergers Syndrome, Autism, High Functioning Autism and related conditions.

    Your voice is missing! You will need to register to get access to the following site features:
    • Reply to discussions and create your own threads.
    • Our modern chat room. No add-ons or extensions required, just login and start chatting!
    • Private Member only forums for more serious discussions that you may wish to not have guests or search engines access to.
    • Your very own blog. Write about anything you like on your own individual blog.

    We hope to see you as a part of our community soon! Please also check us out @ https://www.twitter.com/aspiescentral

Have any autistic people on this forum created a product?

Very early on in my illustrious career, I helped build and design parts for mass spectrometers.
At one point in time, we specified that the material being used as 304 series stainless steel instead of the free machining 303 series they had been using.
The changeover was necessary because some of our vacuum systems pulled a 10 to the negative 7th power torr vacuums that were necessary for the analysis they were to perform.

303 stainless steel has a higher sulfur content that acted as a cutting tool lubricant that made the material a little more free machining. (that translates to more efficient material removal at a higher rate of cutting tool surface speed)
In turn, free machining materials produce less heat during the process, so tighter tolerances can be held due to the lesser amounts of expansion during the cutting process.
The additional sulfur in the 303 series material began to outgas at the negative pressures we required, which in turn, contaminated the sample being tested.
The real eye opener was when we built a system for 10 to the minus 13th power torr vacuum.
It took a solid month to pump down, using a combination of roughing mechanical pumps to get to 10 to the minus 3 torr backed up my turbo-molecular pumps and silicone oil diffusion pumps after it got there,all working together for the end result.
The first leak tests were done with a mass spec probe in place and helium as the sample gas for the leak detection.
The chamber welded areas were marked where the leaks were detected and sent back to the fab area for rewelding of the leak areas.
Another month of pumping went by before the vacuum was fully pulled again.
To our surprise, the leaks we first detected were sealed, but there were many more new ones that showed up.
Back to the weld shop, then another month of pumping after re-assembly.
Now there were even more leaks yet, many in places that had passed the leak checks previously.

Back to the drawing board.
A production meeting was held with the shop and some well respected physics guys.
The outcome was that the leaks were small enough to be clogged by helium molecules that fell away from the breaches after the system was vented back to atmospheric pressure.
That explained the leaks that returned, and why some were never fully detected.
The solution was to do the leak checking with pure hydrogen gas that is a smaller yet more dangerous molecule to work with.
We finally succeeded in getting all of the breaches repaired, but in all it took a full year before the unit was ready to ship.

A breach is just that, a place for unwanted things to enter what you are trying to keep them out of.

The moral of this story is, sometimes it requires using ugly materials to achieve a good end result ;)

Good read. Thanks for sharing.

Too bad some of those physics guys weren't working for Morton Thiokol. Reminded me of the issues of thermodynamics and how it can potentially alter the intended parameters of seals on a molecular level. :oops:
 
Motorola patented an invention of mine when I worked for them. The company has subsequently changed hands and Google now owns their patents.

It was patent# 5,504,812; Improvements to the Cellular Headset.

Motorola's lawyers did all of the heavy lifting. It was a legally intensive process.
 
I made lip balm filling trays, polyethylene soap mould boxes, cutting harps and a logo stamping die for Burt's Bees soap products.

In manufacturing, often you never see the results of your work on a retail display, but this was one I do get to see.

IMG_1479.JPG
IMG_1484.JPG
IMG_1487.JPG
IMG_1491.JPG
 
Will someone please invent an airtight guacamole storage container for me?! I hate trying to smash plastic wrap on top of the guacamole to prevent it from turning brown! Hubby is addicted to it so I make it almost every day.

Put it in a ziploc sandwich bag (or whatever other size it fits). Zip it closed most of the way, leaving about an inch unzipped. Pop that inch open into a circle shape, and use your mouth to suck all the air out of it. Then, squeeze the last inch of the ziploc bag closed. Voilà, airtight container with no air inside!
 
I have never made a product all by myself, but I fit well as a small cog in a big machine - one employee out of a company of 5,000.

As a small cog, I have:
* Solved some problems that took a product from impossible to release to possible and working.
* Produced 175 patents for my company.
* Come up with solutions that radically changed the way products worked, and which were accepted and implemented by the company. (By looking at the patents where I was the first inventor and where the patent describes the way we actually did it, I can show that this happened 7 times in a 20-year career. For one employee out of 5,000, I think that's something to be proud of.)
 
Last edited:
I am trying , but my executive dysfunction makes it difficult to map out all the things I have to do to get it to the product line.

Executive function problems are really hard problems. Recognizing them helps soooo much.

Before my diagnosis, I stressed out about my behavior. I wondered, "Why do I only do certain tasks, and only do them if I can do them 'my way'?" I seriously wondered if I was being a prima donna and demanding special treatment - like everyone else just does what they're told, so what's wrong with me?

If a task isn't completely laid out, step-by-step from start to end, I tend to shut down and avoid it. Recognizing that as an executive function issue helps me look for solutions that NTs don't need or wouldn't consider. I write myself a list of tasks in the morning. I take big tasks and physically write down the steps to them. If a step is too big, I have to break it down into smaller steps.

Once I have the plan all written down, I follow the plan - work on one step and force myself not to think about the next step until it's time to do it. I have to trust the thinking I did earlier - Worker Rex has to trust that Planning Rex knew what he was doing, and not second guess everything.

A big help is anything you can do to reduce the number of things you have to think about and removing distractions. Anything that can be written down or put into a reminder to handle later takes one item out of my head. Anything that can be done in a few minutes to remove a task or worry should be done immediately.
 
I made a game, thanks to an indie dev I've known for awhile. Joined up as part of a small team, was given some authority over the project. Because.... because.

But here's the thing: I'm not much of a coder. And I'm about as organized as a tornado, and just as professional.

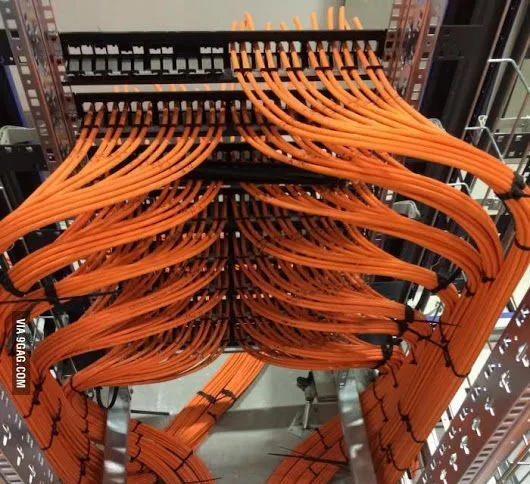
This is a representation of what normal, professional code looks like:

wires11.jpg


But that's not what I do. No. Things I make dont come out that way, you see. So instead:

wires2.jpg


There we have a photo of a team member exploring whatever fresh hell I injected into the game the day before.

There are certain things in the game where I in fact did make them myself, but frankly have no bloody clue how they work. That they DO work is moderately baffling.


The project turned out well in the end, and wasnt my last with that dev.

Still, giving ME authority over anything at all is usually not a very good idea.

Now, I would love to make a board game. I have ideas, but... nothing good yet. Heck if I even know what goes into the process. But I'd sure like to do it.
 
mini alt kits.JPG
a 60 amp unit.JPG
I designed and sold low mount compact alternator kits with an added crankshaft power pulley.
They were sold to NHRA and IHRA drag racing competitors with three versions available, small block, Mark IV big block and the 348/409 series of V-8s.
These units allowed a smaller higher amperage alternator to be mounted on the power steering locating bosses in older Chevrolet V-8 engines.
The lowered mount made for a shorter drive belt and aided in lowering the mass on the vehicle.
The deeper groove pulleys aided in keeping the belt from hopping off the pulleys at higher RPMs
All of the mounting hardware and the alternators were included in each kit, so with some very basic wrench time and a simple one wire hookup, they were plug and play.

All of the work was done on CNC equipment using "drops" or leftover material from other production jobs that were running in our shop.
 
shoe.jpg

CNC milled 6061 T-6 aluminum horse shoes for triple crown race horses.

Offered in sizes ranging from 0 to 12.

Sometimes, we were asked to make custom fitted ones with angled mounting surfaces to fix a lame horse.

They are fitted with a free poured polyurethane cushion and attached with a kevlar cloth that is sandwiched between the shoe and the cushion.
The cloth is then attached to the hoof with an adhesive.
No nails, because nails can split a hoof, however, they specified that there would be nail grooves to keep them traditional. The nail grooves added another 50% to the machining time.
Not a great way to turn a profit, but the job pays well, and of course, the customer is always right :p
 
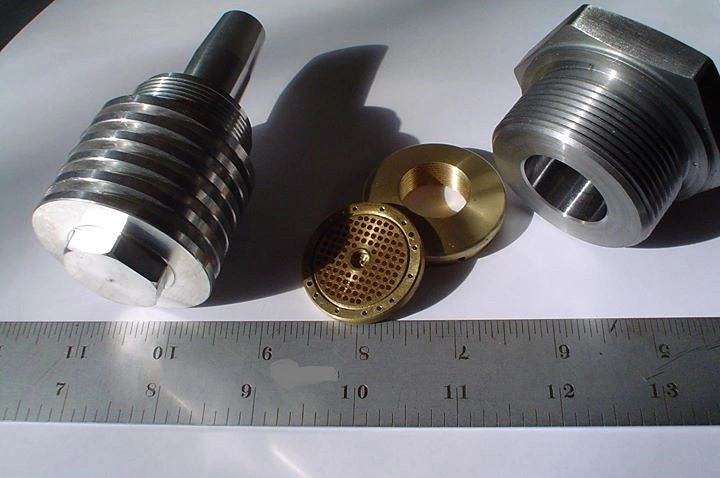
parts.jpg

Left: Replacement lower fork cap with added cooling fins for vintage class Husqvarna motocross motorcycles.
Center, brass: An element and an end cap for studio grade recording microphones.
Right: an oil galley adapter fitting to add an engine oil pre-luber to a Komatsu engine.
The pre-lube units will not allow an engine to be started until the oiling system achieves full oil pressure which is provided by an add-on electric oil pump.
 
View attachment 57607
CNC milled 6061 T-6 aluminum horse shoes for triple crown race horses.

Offered in sizes ranging from 0 to 12.

Sometimes, we were asked to make custom fitted ones with angled mounting surfaces to fix a lame horse.

They are fitted with a free poured polyurethane cushion and attached with a kevlar cloth that is sandwiched between the shoe and the cushion.
The cloth is then attached to the hoof with an adhesive.
No nails, because nails can split a hoof, however, they specified that there would be nail grooves to keep them traditional. The nail grooves added another 50% to the machining time.
Not a great way to turn a profit, but the job pays well, and of course, the customer is always right :p

That's interesting! We no longer shoe our horses because we don't ride them on roads or hard surfaces. The nails can splinter the hooves, and if a horse throws a shoe on a trail ride, the horse essentially goes lame. I've seen farriers use superglue to repair split hooves. Makes sense to glue the shoes to the hooves but how are the shoes removed when the hooves grow out?
 
That's interesting! We no longer shoe our horses because we don't ride them on roads or hard surfaces. The nails can splinter the hooves, and if a horse throws a shoe on a trail ride, the horse essentially goes lame. I've seen farriers use superglue to repair split hooves. Makes sense to glue the shoes to the hooves but how are the shoes removed when the hooves grow out?
They don't keep them on very long, so that probably isn't a major issue, but I was never made privy to the type of adhesive.

When in manufacturing, your focus is always on the bottom line ;)
 
So
They don't keep them on very long, so that probably isn't a major issue, but I was never made privy to the type of adhesive.

When in manufacturing, your focus is always on the bottom line ;)


Going forward did you have to come up with the blueprints for manufacturing or how did you search for a reputable manufacturer that wouldn’t steal your ideas?


Did the company patent it first ( I know patents don’t do a whole lot - especially if you have to battle in court) ?

Anyone feel free to chime in on this.
 
Going forward did you have to come up with the blueprints for manufacturing or how did you search for a reputable manufacturer that wouldn’t steal your ideas?

Did the company patent it first ( I know patents don’t do a whole lot - especially if you have to battle in court) ?

Larger companies are typically very patent savvy and will have their attorneys review new products for patentable ideas. Generally, when you work for a company, either as an employee or a contractor, they own the ideas you come up with, so the patents list you as an inventor but list the company as the owner.

Patents are expensive - like $10,000 - $50,000 to get a patent. The U.S. used to give you a year after you publish something to file a patent on it, but I think they're moving to follow international law and say that the first person to file a patent gets it. So you're really best off filing something before you make any part of it known publicly.

If you produce the designs and contract with a manufacturing company to build it, you usually get them to sign something that says that you own all rights to it. It would be good to have a lawyer on retainer to advise you before you disclose anything and to review any legal agreements.
 
So


Going forward did you have to come up with the blueprints for manufacturing or how did you search for a reputable manufacturer that wouldn’t steal your ideas?


Did the company patent it first ( I know patents don’t do a whole lot - especially if you have to battle in court) ?

Anyone feel free to chime in on this.

We were the manufacturer, so no, we didn't have to locate one.
Our place did not hold the patent, and I'm not even sure that there was one to begin with, because we were just an outsourced vendor about twice removed.
From our shop, they went to the urethane people people for the cushion and the kevlar.
We were given a drawing with basic dimensions to follow, concerning arcs, the toe nose radius and the thickness.
From there, we generated tool paths and set up the cuts to be done 4 shoes at a time, nested to eliminate waste material.
In all, they were cut out of 3/8" x 8 bar stock, with each size calculated for the size the raw stock was to be cut.
When the workers were sawing the material, they were given cut sheets that I made to minimize the drop end lengths. (scrap material)
The flat stock was CNC drilled for hold down bolts that attached them to specific fixtures.
There were places on the perimeter of the shoe cuts that left 1/8" thick narrow tabs to hold them in place for the finish machining. After the parts were done, the tabs were broken with a simple cold chisel and the shoes hand finished on a belt sander.
Most of the raw material ended up in the scrap bin after the machining was completed.

If I can locate an image, I can further outline the machining process.

For a while, we had a contract to surface polyurethane tires on roller coaster wheels, but the product liability insurance went thru the roof for both our operation and the urethane people.

Our shop was one of the few in our area that was able to finish grind and size polyurethane, something my Father took to learning when he was first approached with the work.
Dad's an autie too ;)
Another detail we did for the urethane outfit was to make the free pour moulds for them, generally out of steel.
 

New Threads

Top Bottom