-
Feeling isolated? You're not alone.
Join 20,000+ people who understand exactly how your day went. Whether you're newly diagnosed, self-identified, or supporting someone you love – this is a space where you don't have to explain yourself.
Join the Conversation → It's free, anonymous, and supportive.
As a member, you'll get:
- A community that actually gets it – no judgment, no explanations needed
- Private forums for sensitive topics (hidden from search engines)
- Real-time chat with others who share your experiences
- Your own blog to document your journey
You've found your people. Create your free account
You are using an out of date browser. It may not display this or other websites correctly.
You should upgrade or use an alternative browser.
You should upgrade or use an alternative browser.
Talking About Trains...
- Thread starter Captain Caveman
- Start date
THAT is handy ,,I think HO guage.is more easily available , here .
Similar to 00 gauge over here. 12.5mm (12.6mm) wheels are the largest I use but 10.5mm or similar sizes are really useful. 00 and H0 run on the same track width, as do these larger scale narrow gauge trains.
Looking like more research to be fone locating the HO guage travks on my end , and am hoping to "not" to have to engage in building those myself aswell. Wagons must come later ,there is a time and finance issues here. And ability to do the other requirements .
Am still letting my mind wander of the appearance and type of diorama that I wish to have it represent. ( most likely mountainous mining layout)
Am still letting my mind wander of the appearance and type of diorama that I wish to have it represent. ( most likely mountainous mining layout)
Looking like more research to be fone locating the HO guage travks on my end , and am hoping to "not" to have to engage in building those myself aswell. Wagons must come later ,there is a time and finance issues here. And ability to do the other requirements .
Am still letting my mind wander of the appearance and type of diorama that I wish to have it represent. ( most likely mountainous mining layout)
To turn on a 3ft wide layout one uses the standard first radius curves. The couplings the loco and brake van has are designed with this in mind. To turn on 2ft wide boards, one ideally needs to make the couplings I make, though those couplings can just about do it; and also one needs to carefully bend some flexible track which come in yard lengths which are cut to size if one wants to form sharp curves. (Some larger locos and stock may not run on sharp curves which is just like the real thing!)
Last edited:
I see the need for the brake vans , in order to maintain a little historical accuracy.To turn on a 3ft wide layout one uses the standard first radius curves. The couplings the loco and brake van has are designed with this in mind. To turn on 2ft wide boards, one ideally needs to make the couplings I make, though those couplings can just about do it; and also one needs to carefully bend some flexible track which come in yard lengths which are cut to size if one wants to form sharp curves. (Some larger locos and stock may not run on sharp curves which is just like the real thing!)
Nut , from your writings, I can tell the 100 rail is possibly the exact thing,I am looking for.?
But ,I can see a issue,, those rails are going to need to be able to negoitiate alittle tighter curves. Am anticipating the tunnels will need to be smaller Ore mine sized. Definitely narrow guage.
2 foot would be the most practical for the layout ,I have in mind. Thank you for the time to help me work out the various configurations that I am having mind . Please know that your experience in the Model railroading ,business/ hobby is very appreciated.!

I don't have a business... I love the hobby as I have always loved it.
un
understood. my mistake , figured to know as much as you do ,you must have been doing this for a long time . Thank you. regardlessI don't have a business... I love the hobby as I have always loved it.
You can make waggons to go behind your locomotive?
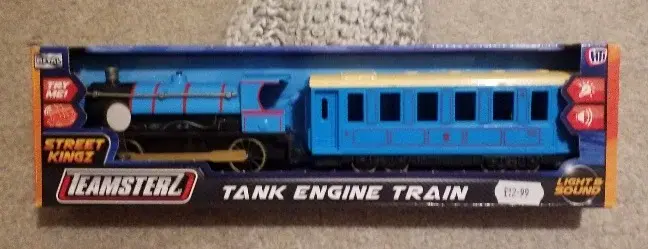
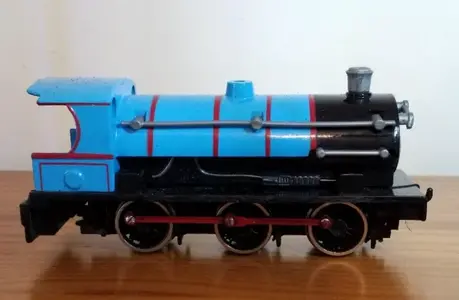
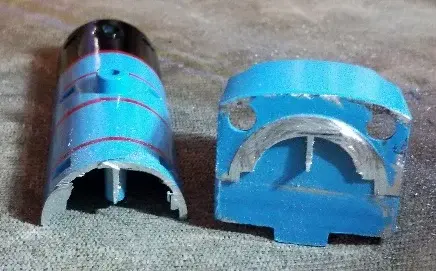
Is surprizing the things one can do. I bought these fun push-along toys to convert the coaches for 7mmNG use, and I realized that the locomotives have potential for conversion too... So while I am no where near finished as a project, I have found things are working out well.
Attachments

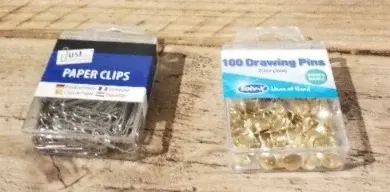
Brilliant idea on modifying paperclips, Mr Caveman, you prolly need to know that functionally my dominate hand is disabled to a great degree. So making my own Wagons coukd be a very slow process. But you have given me sooo many ideas on how to fabricate things in Model Railroading. That am sure with a few extra days and tools and some bogey wheels . I might be able to do thisPaper clips (Left) and drawing pins/thumb tacks (Right). (Do you have a different name for paper clips in America?)
The drawing pins are used to make the Central buffers with, and the paper clips I use to make the "Drop loop" couplings.
Guess ,you prolly already know,that you can use strongly brewed coffee water to stain popsicle sticks and the lot, for a more aged wood appearance.
Did not know. I use old wood, or I use paint or dirt?
Just wanted to offer that as a idea...had read that strong coffee, had been used to stain woods ,Long ago..Hope things are doing well at your place.Did not know. I use old wood, or I use paint or dirt?

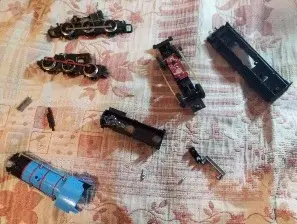
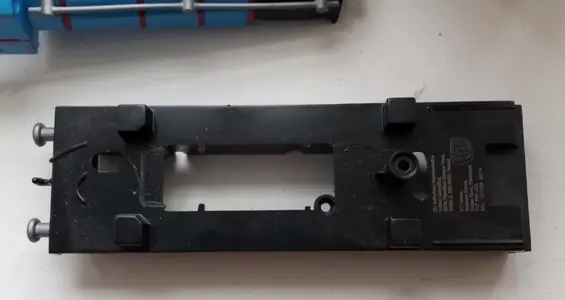
Wow.. that is so cool that you show all the parts before you start the imagineering processThe next step is this....
Look how lovely and thick the metal is!
your skills are pretty darn good from the things I have seen you create .And I have first hand experience with at least one of your projects now .
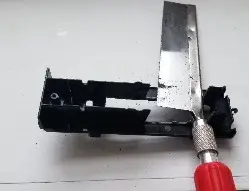
Well, I needed to make the side of the cab flat and shorten the tank a bit, so those were my next tasks.
As the material would have taken quite a while to file, even with a large file, I found it easier to first rub it on the flat concrete step of the workshop to grind off the excess to make it flat. The razor saw tends to work well with this material. I think it is mazak, which does tend to clog up teeth or clog up files which is why it is usually not so easy to work with, but I found as the razor saw has very thin teeth, they are not so likely to become clogged. The razor saw I have is known as a "Pull saw" and I must say I am not used to reversing my direction of force so I kept it the same on both directions of stroke. It didn't seem to mind. It coped well which is surprizing as I would say that the blade is only really intended for light work such as plastics or wood.
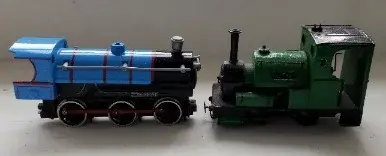
Photographs will follow soon. I have done half the filing and cutting. I was going to do more before photographing but we shall see...
As the material would have taken quite a while to file, even with a large file, I found it easier to first rub it on the flat concrete step of the workshop to grind off the excess to make it flat. The razor saw tends to work well with this material. I think it is mazak, which does tend to clog up teeth or clog up files which is why it is usually not so easy to work with, but I found as the razor saw has very thin teeth, they are not so likely to become clogged. The razor saw I have is known as a "Pull saw" and I must say I am not used to reversing my direction of force so I kept it the same on both directions of stroke. It didn't seem to mind. It coped well which is surprizing as I would say that the blade is only really intended for light work such as plastics or wood.
Photographs will follow soon. I have done half the filing and cutting. I was going to do more before photographing but we shall see...
Last edited:
Its been so long ago ,that whwn I was younger, I remember trying to do some crafts with plastic or bakelite, ( the stuff that came just before they had plastics) my fabourite and easiest way to file surfaces down , was " Exactly as you do " on concrete slabs . It was more stable than a file .
I have a little bakerlite. I had to quickly break the sheet to get it to fit in my plastic containers when I moved and it has very sharp edges.
Overhere, as one of the tools we had available was a little high speed mini drill. Called Dremel,,That you could attack a circular saw / cutter bit to...that would possibly cut bakelite, very nicely if you were Not ,in a hurry to cut it . Milwaukee made a battery powered one for sale ,also
Last edited:
Share:
New Threads
-

-

-

-

-
How to appeal to neurodivergent women online?
- Started by BrianWV39
- Replies: 74
-
Lou Laurinen (formerly known as Luca) - its her wedding day on Sunday
- Started by Alexej
- Replies: 33
-
-
-
Trying to find potential dates on dating apps and the internet only.
- Started by BrianWV39
- Replies: 11
-